BANYULE BUILDING MAINTENANCE GROUP
HELPFUL POSTS

Commercial Painters Melbourne: A Practical Playbook For Longer-Lasting Office, Retail, and Strata Finishes
Melbourne commercial repainting focuses on uptime, durability, air quality, safety, and handling mixed substrates, with interior, exterior, and roof works scoped under one plan. Key points:
– What makes it different: after-hours and staged zones for minimal disruption; high-traffic resistant finishes; low-odor, low-VOC systems; compliance and dust containment; and mixed substrates (plasterboard, render, concrete, metals).
– Microclimates: west/north elevations need premium exterior acrylics and light colors to reduce heat; leafy pockets need breathable coatings; bayside/coastal areas require corrosion protection; inner-urban areas address grime with scheduled washes.
– Interior zones: walls use durable matte/low-sheen acrylics; ceilings hide defects with true flat; wet areas require moisture-resistant systems; doors/trims use satin or semi-gloss; primers spot-prime and address adhesion; color strategies include day/night testing, wayfinding, and brand alignment.
– Exterior assets: weatherboards, render, brick, and metal start with defect inspection, washdown, and compatible primers, followed by two topcoats; specific substrate primers (timber, masonry, metal) are used.
– Roofs and eaves: coatings refresh appearance but do not fix leaks; repair and drainage checks first; ensure gutters and valleys are clear.
– Low-disruption planning: assess substrates, map defects and access; sequence zones; contain dust/odor; protect assets; enforce quality control.
– Maintenance rhythm: quarterly spot-cleaning; biannual exterior washes; annual UV/elevation checks.
– Product/substrate pairings: office corridors (plasterboard, patching, durable matte); retail doors (adhesion primer, satin/semi-gloss); lift lobbies (masonry primer, scrubbable finish); exterior sun walls (UV exterior); metal balustrades (metal primer, UV topcoat).
– Quick planning checklists by sector: Office/coworking; Retail/hospitality; Strata common areas.
– FAQs questions:
– How do commercial and residential repaint schedules differ?
– Do low-VOC paints still perform well in high-traffic areas?
– Will lighter exterior colors reduce heat on west and north faces?
– Can roof painting stop a leak?
– What information helps produce a reliable commercial painting quote?

Shower Renovations Melbourne: Practical Design Moves, Waterproofing Truths, and Details That Make Daily Use Better
– Purpose: Melbourne shower renovations focusing on layout, waterproofing, drainage, tiling, and fixtures to create safer, easier-to-clean, longer-lasting showers for full renovations or targeted upgrades.
– Plan first: aim for 900×900 mm minimum (1000×1000 ideal); preserve 800 mm main path; choose door logic (frameless pivot, sliding, or walk-in); level-entry thresholds improve accessibility.
– Waterproofing and falls: full membrane with upturns at walls/niches/benches; finalize set-out before waterproofing; linear drains simplify falls; consider substrate type and treatment; include movement joints.
– Tile strategy: large-format porcelain reduces grout; epoxy grout in wet zones; align grout lines with fixtures and features; ensure slip-rated floors.
– Drainage choices: linear vs point drains based on aesthetics, fall complexity, and cleaning; both workable with correct set-out.
– Ventilation: externally ducted exhaust sized to room; add humidity sensors or run-on timers; plan for acoustics in apartments and corrosion resistance bayside.
– Fixtures and fittings: rail+handheld showers; solid brassware with serviceable cartridges; frameless or minimal-frame glass; place niches to avoid direct spray.
– Melbourne microclimates: tailor ventilation, sealants, finishes; address coastal salt for bayside; adjust for leafy or shaded areas.
– Level-entry specifics: careful threshold gradient, continuous membrane, correct falls, and slip management (consider underfloor heating).
– Storage without crowding: shallow vanities (400–430 mm), recessed mirror cabinets, in-shower niches.
– Budget strategy: protect substrate, consolidate services, use one durable hero surface, standardize widths.
– Mini checklists: Walk-In Shower; Compact Family Shower; Future-Friendly Upgrade.
– Common mistakes to avoid: tile decisions before drain/falls; under-spec ventilation; missing movement joints; poorly placed niches.
– FAQs (questions):
– What size shower feels comfortable in a compact bathroom?
– Is a level-entry shower worth it?
– Do large-format tiles work in small showers?
– What adds the most to shower renovation cost?
– How important is ventilation?
– Practical sequencing: measure/layout, lock drains, prep substrate, tile with planned falls, epoxy grout in wet zones, install fixtures and seal, test ventilation, final clean.
– Pro tip: coatings/glass don’t fix poor falls or gaps in waterproofing.
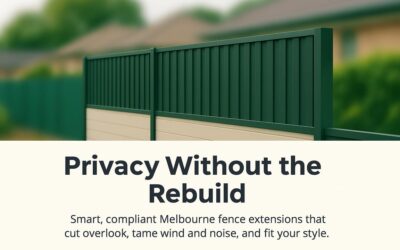
Fence Extensions Melbourne: Smart, Compliant Ways To Add Privacy, Reduce Overlook, and Handle Wind
Fence extensions in Melbourne restore privacy from overlooks, reduce wind and glare on boundaries, dampen noise when paired with toppers and planting, and screen pool zones without a rebuild.
Types: Colorbond toppers for steel fences; timber slat screens for warmth and adjustable sizes; lattice or decorative screens to soften outlooks; mixed steel bases with timber or composite toppers to balance cost and maintenance while considering wind.
Heights/compliance: Side/rear fences commonly 1.8–2.1 m; front fences lower; dividing fences usually require neighbour agreement; pool barriers must comply and avoid climbable features. Check if a permit is needed for height, location, or overlays.
Wind/structure: Extensions add sail area; ensure posts/footings are adequate; upgrade if needed for height or exposure; use compatible fixings; stepped panels on stepped sites.
Microclimate: West/north aspects need UV-stable finishes and glare control; shaded areas benefit from breathable timber finishes and ground clearance; bayside requires marine-grade hardware and gentle rinse-downs; wind corridors may need stronger posts.
Maintenance: Choose durable materials; keep soil/mulch away from bottom rails; ensure drainage; pair with planting to boost privacy and acoustics.
Plant screens: Softens lines and improves acoustics; columnar evergreens or climbers with non-climbable trellises; drip irrigation.
Color/style: Coordinate toppers with existing fences and facades; align colors with roofs/gutters; use a common trim color for mixed materials.
FAQs:
– Do fence extensions always need neighbour approval?
– Will an extension make a fence too heavy or unstable?
– What height is typical for privacy without a full rebuild?
– Which materials suit bayside locations?
– Can extensions help with noise?

Window Replacement Cost Melbourne: A Practical 2025 Guide To Price Drivers, Smart Trade-Offs, and When Repair Still Wins
Key takeaways:
– Pricing varies with frame material, glass spec, installation method, access/finishing.
– Typical opening costs (excluding complex work): aluminium 150–400; uPVC 350–750; timber 800–2000 AUD; double glazing/laminates add cost but boost comfort.
– Five levers most homeowners underestimate: glass choice, installation approach, opening style, access/finishing, microclimate extras.
– Melbourne microclimates: tailor spec by elevation (west/north sun), moisture, salt, noise considerations.
– Repair vs retrofit vs replace: repair frames if sound; retrofit inserts if frames straight/dry; full-frame if decay/leaks/major upgrades.
– Credible quote should include: measured sizes, frame/material/hardware, glass ratings, installation method, flashing/sealing, access/waste/making good, photos or sketches.
– Comfort/energy: target problem elevations; solar-control Low-E for hot facades; laminated for noise; airtight sealing.
– Budget-smart sequencing: fix water paths first; address loudest/hottest/coldest rooms; choose durable hardware/seals.
– FAQs (questions only):
– What affects window replacement cost the most?
– Is it cheaper to replace glass only?
– How do Melbourne microclimates change the spec?
– Retrofit inserts vs full-frame replacement: which is better?
– What should be included in a quote to avoid surprises?
– Practical checklist: goals, microclimate, frames, glass, installation details.
– Pro tip: coatings/paint boost appearance/UV resistance but don’t fix structural decay; water paths first.
– Disclaimer: seek on-site assessment for accurate pricing.

Deck Staining Melbourne: A Microclimate-Savvy Guide To Colour, Protection, and Longer-Lasting Timber Decks
Deck Staining Melbourne provides a microclimate‑savvy guide to selecting stain types, timing, and maintenance to extend timber life in Greater Melbourne’s high‑UV summers, wet winters, and coastal salt exposure. Coatings improve appearance, UV protection, moisture control, and cleanability, but do not fix structural issues; repair loose boards, drainage, and soft spots before staining. Stain types include penetrating oils (natural look, breathable), water‑based semi‑transparent stains (fast‑drying, tintable UV protection, technique‑sensitive on dense species), and film‑forming clears/varnishes (high sheen with careful prep). Microclimate drives choice: sunny decks need UV tinting; leafy, damp decks benefit from breathable systems and airflow under boards.
Melbourne playbook covers west/north faces, shaded pockets, bayside/coastal, and poolside scenarios, plus species notes (Merbau, Spotted Gum, Blackbutt, Ironbark), prep steps, application windows, upkeep rhythm, common mistakes, and colour planning tips. A quick decision map helps tailor repairs and finishes; professional help is available for tailored systems.
FAQs:
– How often should a Melbourne deck be restained?
– Is pressure washing safe before staining?
– Will stain make a deck slippery?
– Can greyed timber return to rich colour?
– What if stain peels?

Patio Roofing Melbourne: Climate-Smart Choices, Council-Savvy Planning, and Upgrades That Make Outdoor Spaces Work All Year
Melbourne Patio Roofing guide covers climate-smart choices, planning, and year-round use, with practical guidance on materials, drainage, structure, and approvals. It outlines microclimate considerations (west/north UV, leafy moisture, coastal salt, wind corridors), roofing options (insulated panels, single-skin metal, polycarbonate, mixed systems), and strategies to improve thermal, light, and acoustic comfort. It also details maintenance rhythms, smart upgrades, safety, and cost factors, plus when to involve a roofing specialist and planning checks. A disclaimer notes site-specific conditions and professional assessment.
FAQ questions:
– Do insulated patio roofs make a noticeable difference in summer heat?
– Is polycarbonate too noisy in rain?
– How often should a patio roof be cleaned in leafy suburbs?
– Can a patio roof fix interior leaks at eaves?
– What is the minimum fall for patio roofing?

Gutter Installation Melbourne: Smarter Profiles, Storm-Ready Drainage, and Local Choices That Actually Prevent Overflow
Melbourne gutter installation focuses on smarter profiles, storm-ready drainage, and local choices to prevent overflow. It explains that capacity hinges on profile, outlets, downpipes, and correct falls, aiming to move water off roofs and away from foundations with a durable, low-maintenance system. Profile options include Squareline/rectangular for high capacity, Quad for established homes, and half-round for self-cleaning hydraulics; material choices span Colorbond steel, aluminium, and copper with compatible fasteners. Compatibility and corrosion prevention are emphasized. Downpipes, outlets, and proper fall are key drivers—oversized outlets, more downpipes, shorter runs, and spreaders/rainheads improve performance. Integration with valleys, flashings, and rainheads at joints enhances drainage. Gutter guards help reduce leaves but do not fix poor falls or capacity; bracket spacing and thermal movement must be considered. The guide also covers local scenarios, a simple decision map, cost signals, and seasonal upkeep, plus a quick pre-install checklist. A disclaimer notes site variability and safety considerations.
FAQs
– What profile is best for heavy Melbourne downpours?
– Do bigger outlets and extra downpipes really reduce overflow?
– Are gutter guards a set-and-forget solution?
– Which materials suit bayside homes?
– How can staining on fascias be prevented after installation?

Retaining Wall Repair Melbourne: Practical Diagnosis, Safer Fixes, and Drainage Tweaks That Make Walls Last
Melbourne Retaining Wall Repair guide: practical diagnosis, safer fixes, and drainage tweaks for local soils and slopes.
– Fast triage (10 minutes): movement (lean, bulge, cracks), water signs, material distress, interfaces. Principle: fix drainage and footing first.
– Why walls fail: hydrostatic pressure in clays; poor backfill and lack of filter/drain; shallow embedment; corrosion/decay; added loads.
– After-rain check: toe soil fans; test outlets; top-line tilt; probe near grade; photos for trend.
– Repair pathways (high ROI):
1) Drainage rehab: verify backfill, install free-draining media, perforated pipe to lawful discharge, filter fabric, add/unblock weep holes, redirect water away.
2) Structural stabilisation: timber walls—new posts, deeper footings, renew sleepers; concrete sleepers—replace sleepers, align posts, upgrade footing; segmental walls—rebuild with geogrid and proper batter.
3) Interface fixes: separate fence posts, clear paving from weep holes, maintain inspection gap.
– Timber vs concrete sleepers: rot risk/decay vs strength; ensure proper footing and coatings.
– Melbourne microclimate tips: west exposure—drainage and shading; leafy suburbs—more moisture; bayside—galvanised hardware; hills—higher groundwater.
– Permits/engineering: walls around 1 m or carrying surcharge require design approvals; ensure lawful subsoil discharge.
– Simple decision map: localised defects with good drainage → targeted rebuild; movement with poor drainage → rebuild drainage then assess; widespread lean → staged, engineered reconstruction.
– Maintenance rhythm: late winter outlets check; spring irrigation check; summer shrink-swell watch; autumn debris clearance.
– FAQ questions:
1) What are early signs a retaining wall needs repair?
2) Can a leaning retaining wall be repaired without full replacement?
3) Do all retaining walls need subsoil drainage?
4) Who is responsible for repairing a boundary retaining wall?
5) When is engineering or a permit required in Melbourne?
– Add-ons: oversized outlets; filter fabric; independent fence footings; visible weep holes.
– Disclaimer

House Painting Cost Melbourne: A Practical 2025 Guide To What Drives Price, Where Money Pays Back, and When To Tackle Interior vs Exterior vs Roof
Melbourne house painting costs in 2025 hinge on prep depth, scope breadth, access, substrate, colour changes, and microclimate. A measured defect-first site assessment is the most reliable step before pricing.
Key price signals
– Interior: price mainly driven by prep and scope (walls only vs walls/ceilings/trims).
– Exterior: wide range due to access, height, substrate, and repair needs.
– Roof coating: priced by roof size, condition, repairs, and access, not just color change.
Real cost drivers you can plan for
– Preparation and repairs
– Scope width (walls, ceilings, doors, trims)
– Access and height
– Substrate and product system
– Colour changes
– Microclimate
– Scheduling and protection
Interior painting: where spend pays back
– Lasting prep (patching, crack repairs, stain blocking)
– Right sheens by room
– Colour testing under day and night light
– Low disruption sequencing and ventilation planning
Exterior painting: Melbourne microclimate rules
– Weatherboard: prime bare timber, seal end grain, premium acrylics
– Render/brick: inspect cracks, salts, porosity, prime properly
– Metalwork: degrease, spot-prime, substrate-specific topcoats
– Access/safety: plan around weather for scaffolding/towers
Roof coating: adds cost and value
– Tile roofs: repairs, cleaning, primers, membranes
– Terracotta: repair-focused, system-specific primers
– Metal roofs: rust treatment, metal-compatible primers, lighter colours
Timing that saves money
– Interior: any season with ventilation
– Exterior: avoid wet weeks/heat spikes
– Roof: dry, mild conditions
Simple calculator prompts for a sharper quote
– Floor area, ceiling height, room count
– Substrate type and condition
– Scope (walls, ceilings, trims); exterior inclusions; roof material
– Access constraints; colours; timing
Melbourne microclimate cheat sheet
– West/North: higher UV; lighter outside colours
– Leafy pockets: moisture management and ventilation
– Bayside: corrosion-prone metal prep
– Inner-urban: plan staging and cleanup cadence
Where quotes shrink or swell
– Surface condition; scope breadth; access/height; colour change/sheen; product system
How to balance budget and durability
– Prioritise prep and matched primers
– Select appropriate sheens
– Target high-UV faces first; lighter exterior colours
– Stage multi-scope projects by season and weather
Related service spotlight
– Banyule Maintenance Group provides interior, exterior, and roof painting with measured assessments and transparent pricing in Melbourne.
FAQ questions
– Why do two painting quotes for the same house differ so much?
– Is roof painting a fix for leaks?
– How often should exteriors be repainted in Melbourne?
– Do lighter roof and exterior colours really reduce heat?
– What information should be provided to get a precise quote?

Bathroom Makeover Melbourne: 12 High-Impact Upgrades That Elevate Everyday Use, Durability, and Value
Bathroom Makeover Melbourne focuses on practical, durable upgrades that improve everyday use, storage, moisture control, and value in real Melbourne homes. A single coordinated team can streamline waterproofing, tiling, cabinetry, and finishing. Benefits include better flow, reliable moisture management, smarter storage, daily comfort, and long-term durability.
12 high-impact moves:
1) Plan layout first to protect an ~800 mm main path; avoid door swings into the toilet; consider a cavity slider in tight spaces.
2) Right-size the shower: minimum 900×900 mm; level-entry with a linear drain.
3) Non-negotiable ventilation: externally ducted fan sized to the room; timer or humidity sensor; plan routes early in apartments.
4) Surfaces: porcelain floors/showers; ceramic/porcelain walls; epoxy grout in showers; movement joints.
5) Drawer-first storage: ~400–430 mm deep vanities; recessed shaving cabinets; power inside cabinets.
6) Wall-hung fixtures to free floor space; plan reinforcement.
7) Layered lighting: task at mirrors, ambient overhead, night lighting; warm white 3000–3500 K.
8) Durable tapware: solid-brass bodies, serviceable cartridges, spare parts.
9) Tile set-out: align grout with benchtops and fixtures; plan falls before waterproofing.
10) Moisture-ready cabinetry/benchtops: moisture-resistant substrates; sealed edges; silicone sealant.
11) Melbourne microclimates: adapt finishes/ventilation for sun, shade, coastal exposure, and apartments.
12) Future-friendly details: rails, level-entry, slip-rated floors for aging in place.
Makeover pathways: refresh, selective rework, or full redesign. Budget tips: consolidate plumbing, pick a hero surface with durable field tiles, standard vanities with adjusted depths, invest in behind-wall waterproofing/ventilation.
FAQs (questions only): How big should a shower be for everyday comfort? Do large-format tiles work in small bathrooms? What matters most for long-term durability? Is a level-entry shower worth it? Can storage be increased without shrinking the room?
Practical sequencing: measure, confirm layout/vent/drain, fix key finishes, strip-out and prep, tile, cabinetry, fit-off.

Window Repairs Melbourne: A Practical Homeowner Guide to Warmer Rooms, Quieter Nights, and Longer-Lasting Frames
Overview: A Melbourne-focused guide to window repairs that restore operation, seal drafts and water, and protect surrounding walls. It explains what to look for, how to prioritise fixes, and when replacement is the smarter option.
Fast checks: 60-second signs your windows need attention—sticking or misbehaving sashes; air leaks at meeting rails, corners, or latches; water cues like sills stains or swelling timber; increased street noise or frame gaps; worn hardware such as cords, rollers, hinges.
Melbourne microclimate: Tailor repairs by elevation and suburb. West/north exposures demand UV-stable seals and coatings; leafy pockets require robust drainage and humidity control; bayside/coastal areas call for marine-grade fasteners and gentle hardware care; inner-urban areas focus on airtight installation and acoustic glass.
Repair triage: Stop water paths, restore frame alignment, renew seals/hardware, refresh glazing interfaces, and finish for durability. Pro tip: coatings don’t fix distorted frames—address root causes first.
Common window types and fixes: Timber sash—replace cords/balances, clean tracks, add weather seals, repair decay; timber casement/awning—seals, hinges, latches, sill slope; aluminium—service rollers/tracks, clear weep holes, treat corrosion; uPVC—adjust locking, lubricate gaskets, clear drainage.
Comfort upgrades: Perimeter seals, Low-E/laminated glass, secondary glazing, exterior shading.
Repair vs replace: Repair if frames are sound and leaks are seal/hardware-related; partial renewal for localized damage; full replacement for widespread decay or major performance gains.
Seasonal upkeep: Late winter drainage and latch checks; spring seal renewal and hardware service; summer cleaning and coating checks; autumn leaf clearing and sealant checks.
Cost drivers: scope/number of openings, access, hardware availability, glazing specs, and heritage/finish requirements.
Mini checklists: Weekend wins (clean tracks, lubricate seals, adjust latches); repaint prep (repair leaks, prime timber, use exterior sealants).
FAQs
– What are early signs that window repairs are due?
– Will repairs actually make rooms warmer and quieter?
– Are heritage timber windows compatible with performance upgrades?
– How is condensation reduced in winter?
– When is full replacement smarter than repair?

Pool Fencing Melbourne: A Practical, Compliance-First Guide For Safer Backyards, Clear Sightlines, and Low-Upkeep Boundaries
Melbourne pool fencing blends safety, compliance, durability, and everyday usability while preserving sightlines and low upkeep.
Materials
– Frameless/semi-frameless glass: best visibility; pros—supervision, minimal bulk; cons—cleaning, high-quality hardware, safe-edged glass; Melbourne note—use marine-grade hardware near coast; plan drainage to avoid water pooling.
– Aluminium tubular/batten: durable, cost-effective, easy to keep clear of leaves; cons—less transparency; Melbourne note—UV-stable coatings for sun exposure; ensure adequate footing in wind corridors.
– Mixed solutions: glass near alfresco/kitchen views, aluminium on less-visible boundaries; pros—balanced cost and sightlines; cons—careful style coordination required.
Compliance essentials
– Climbable zones, gate self-closing/latching, ground movement, gaps/clearances, and door/window interfaces must meet current rules.
Microclimates
– West/north exposure, leafy pockets, bayside salt, wind corridors influence material choice, maintenance frequency, and drainage.
Design moves
– Strategic gate placement, safe lighting, non-slip paving, preserving key sightlines, and mapping services before digging.
Maintenance rhythm
– Quarterly gate/latch tests and clearances; seasonal cleaning; post-storm checks; annual hinge/latch tuning and footing inspection.
Repair or replace
– Repair for minor gate/latch issues or isolated posts; partial replacement for multiple damaged panels or widespread corrosion; full replacement for major structural issues.
Cost drivers
– Material/hardware grade, subsoil/access, custom transitions, climate upgrades, and compliance remediation.
Pre-commit checklist
– Define supervision lines, map microclimate, confirm plan-compliant clearances and swing, verify footing, document hardware/specs.
FAQs
– What is the most practical pool fencing material for clear views?
– How often should a pool gate and latch be checked?
– Do microclimates really change maintenance needs?
– Can mixed systems be used to balance budget and looks?
– What are early signs that a barrier is drifting out of compliance?

Deck Replacement Melbourne: A Practical Decision Guide for Safer, Longer-Lasting Outdoor Living
Melbourne Deck Replacement: A practical decision guide for safer, longer-lasting outdoor living.
– Decision map: surface wear only; localized defects; structural or widespread failure (replacement usually warranted).
– Melbourne microclimate factors: high-UV west/north aspects; shaded/tree-heavy sites; bayside salt; poolside moisture – all shaping finish, ventilation, and corrosion considerations.
– Replacement scope: substructure audit; drainage and under-deck airflow; flashing and interfaces; corrosion-resistant fixings; boarding selection and gaps; finish system compatibility.
– Timber and material choices: Merbau, Spotted Gum, Blackbutt, Ironbark; composites as option with proper subframe ventilation and fixing patterns.
– Finish systems: penetrating oils; water-based semi-transparent stains; film-build clears/varnishes. Coatings protect but do not fix structural faults; ensure substructure and drainage are sound first.
– Safety, compliance, and everyday use: compliant balustrades; appropriate traction; clear access around furniture; planned lighting and protected outlets.
– Cost drivers: extent of substructure renewal; access/height requirements; premium materials and fixings; finishes and detailing.
– Planning checklist: define use zones; map sun/shade/wind; confirm substructure condition and loads; choose timber or composite; lock in flashing, drainage, and ventilation; pick a compatible finish; plan lighting/power early.
– Maintenance rhythm after build: seasonal inspections, cleanings, recoats, and safety checks.
– Related service: deck replacement Melbourne for a coordinated scope.
– FAQs (questions only):
– What are reliable signs that a deck needs replacement rather than repair?
– Do permits apply to deck replacement in Melbourne?
– Which timber suits high-UV, west-facing decks?
– Is composite decking a good idea for replacements?
– Will a new deck reduce maintenance to zero?
– Disclaimer: local conditions vary; a qualified assessment is recommended before committing to repairs or replacement.

Roof Tile Replacement in Melbourne: A Practical Homeowner Guide to Spot Damage Early, Prevent Leaks, and Make Smart Repair Decisions
This Melbourne tile roof guide helps homeowners spot damage early, prevent leaks, and choose durable repairs. It covers practical checks after rain (ceiling cues, eaves staining, cracked or loose tiles, and gutter/valley overflow), common failure points (tiles, bedding and pointing, drainage interfaces, and flashings), and the nuances between concrete and terracotta tiles, including matching and handling older units. It cautions that replacing a single tile may miss hidden faults and outlines broader checks (ridge caps, valleys, backfalls, and flashing seals). It explains how Melbourne microclimates affect repair priorities and lists what a thorough replacement visit includes (assessment with photos, safe access, tile replacement, adjacencies repaired, and a water test). It discusses cost drivers and value signals, describes a seasonal maintenance rhythm, and suggests smart add-ons to extend life (larger outlets/downpipes, upgraded gutters, guards where appropriate, and post-repair cleaning). It notes related services and provides a quick booking checklist.
FAQ
– Does one cracked tile really matter if there is no visible leak?
– Is tile replacement enough if ridge caps look cracked?
– Can terracotta tiles be mixed with concrete tiles on the same roof?
– Will painting a tile roof stop active leaks?
– How often should valleys and outlets be checked in leafy suburbs?

Gutter Repair Melbourne: A Practical Homeowner Playbook For Stopping Leaks Fast, Improving Drainage, And Extending Roof Life
Melbourne gutter repair guide for homeowners: read signs early, understand causes, and decide when to repair, replace, or upgrade.
Early ground clues: overflow in heavy rain, drips at joints, fascia or wall staining, rust freckles, bird debris in roof valleys. A short storm video helps locate overflow start.
Gutters fail in Melbourne due to: high UV on exposed elevations, leafy debris, coastal corrosion, and wind-driven storms.
Durable repairs typically cover: inspection and diagnosis; clearing and flushing; joint rehabilitation; bracket realignment; outlet/downpipe upgrades; corrosion treatment; proof test. Coatings can improve appearance but don’t fix incorrect falls, undersized outlets, or active leaks.
Repair vs replace decision map: repair when leaks are limited to joints, brackets are serviceable, and falls can be corrected; sectional replacement when rust pinholes or backfall affect longer runs; full replacement when widespread corrosion or chronic overflow prevents reliable fix (consider higher-capacity profiles and hydraulic upgrades).
Melbourne microclimate playbook: west/north exposures—UV-stable seals, shorter maintenance, lighter roof-edge colours; leafy suburbs—more frequent cleans, larger outlets; bayside—corrosion-resistant fixings and gentle rinse-downs; hills/ember-risk areas—fine meshes and clear roof valleys pre-summer.
Small upgrades: oversized outlets and added downpipes; spreaders; selective gutter guards; fall correction and bracket spacing.
Profiles and materials: Quad; Squareline/Rectangular; Half-round. Materials: Colorbond steel and aluminium common; copper for premium heritage contexts.
Seasonal care calendar: late winter inspections; spring full clean; summer ember checks and light rinses; autumn main leaf clean.
FAQ questions: Is repair better than replacement? How do costs vary? Will gutter guards mean no more cleaning? Can painting fix leaks? What about downpipes that keep blocking?
Self-check list: note overflow spots, fascia staining, ground pooling, and photograph problem areas after rain.
Disclaimer: general info; consult qualified professionals for assessment and work.